
Azure Image Builder GUI – Gold-ish Disk Builder

Challenges and forget-me-nots
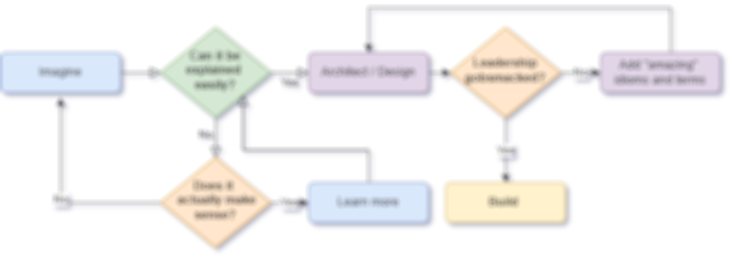
These components represent the general workflow for building an image. While it seems straightforward, there are a couple of elements that left me scratching my head. These are those surprises and the wisdom I was able to glean while building my images:
- IMAGE DEFINITION
- Source (and technically Destination, or Distribution target) - what is the source of the image it can be either a Marketplace image or another image that has been pre-built see Generalizing a VM, (though technically you can build a specialized image). Adding customizations, and then the first part is completed the Image Template Resource and creates its own Resource Group (i.e. IT_\<DestinationResourceGroup>_\<TemplateName>_\(GUID))
- Customizations - my one piece of wisdom in this space is regardless of the OS being templated ensure access to scripts and binaries (read-only) and please, please use the Checksum feature (to generate in Linux - sha256sum mySuperBuilderScript.sh) and then paste the checksum into the script view. See image.
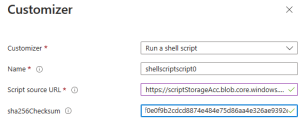
Configuration script - checksum
- IMAGE CUSTOMIZATION
- Components - To build this into an image, it needs three things:
- A network - hopefully use an existing network, else it will take creative license and spin up a public IP address to finish the work.
- A location - technically moving isn't an option, but it obviously can be re-built, or if DR is your fancy replicated (with an Image Gallery)
- A permission(s) - deserves a bigger bullet, but considering the network and resource group that is created permissions should be fully considered here
- Access (bigger bullet) - From using / creating a network, a build resource group, to customizing and distributing the image consider the service principle (or more aptly user-assigned managed identity) access. For more information see here, network security, and script / customizations.
- Components - To build this into an image, it needs three things:
- IMAGE VALIDATION - another critical piece of advice please take advantage of validation. Not only does this help ensure alignment expectations, but also will help mitigate unexpected errors. Again, take advantage of checksum if implementing a shell script!
- DISTRIBUTION TARGETS - So you have a bunch of new resources that pops out in the portal. What are they?
- An Image Template Resource - Mentioned earlier it looks like this, if you would like to hand scrawl one for DevOps pipelines. It's what is really being crafted by the portal. It has the build instructions, and can be built simply by clicking on it in the portal and selecting the "Start Build" operation.
- The Build Creation - So everything in the auto generated resource group - IT_\<DestinationResourceGroup>_\<TemplateName>_\(GUID), can be deleted, if and when the Build has been created.
- The Output - Ideally create an Azure Compute Gallery. It will provides some key features like: Image organizations by build, RBAC access, and replication (it is also leveraged by other services like Azure Batch). Secondly and more succinctly, not to suggest that there will be failures, but errors. A lessoned learned was that I required to disable the network policies on the auto created endpoints, I discovered this from the logs and by logs I mean the deployment logs. An error message will appear during the template deployment and it will be straightforward in terms of finding the error (solving the error may be a different can of worms, but usually there is a referenced article).
Well I hope that this article helps point you in the right direction for getting started. If you run into an unexplained errors or behaviors please comment below.
Comments
Leave a Comment